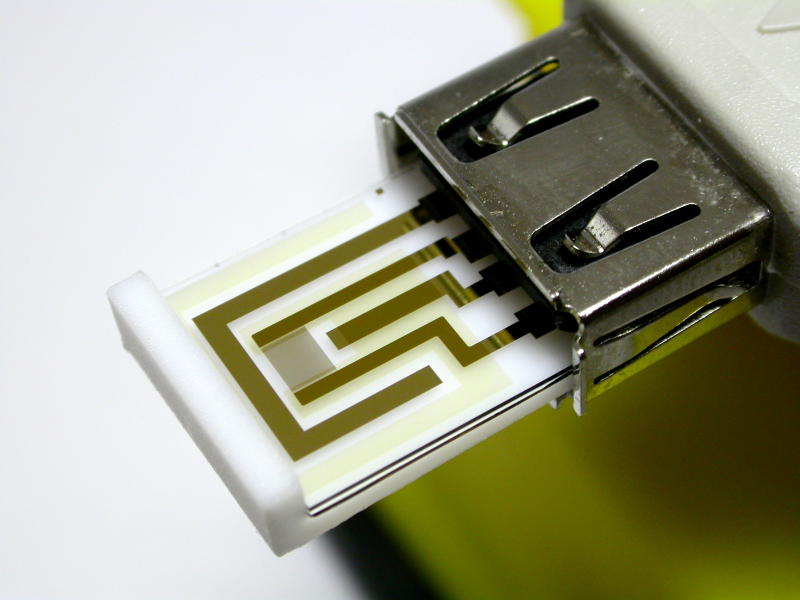
IDA (Interdigitated Array) Electrode 10 µm
Cyclic Voltammetry Measurement using IDA Electrode
![]()
New design of IDA electrode
 Electrode")
Old design of IDA electrode
 Electrode")
Interdigitated 65 pairs of generator / collector
electrodes set off electrochemical RedOx cycling
continuously as shown in Fig. 1. This reaction
significantly boosts sensitivity of the electrode.
Furthermore, samples are preserved when Dual (Red-Ox)
Mode is chosen - Not like as Single Mode eats up samples
at measurements.


Fig. 3 shows voltammograms of ferrocene samples ((a),(c): 10 µL , (b),(d): 0.2 µL) using IDA electrode ((a),(b): Dual mode; (c),(d): Single Mode). As they indicate, measuring mode makes obvious difference on their responses. Dual mode reinforces reduction current at collector electrodes with increase of oxidation current at generator electrodes. At the measurement (d), response is scarcely obtained because the sample was consumed during the experiment.

| Catalog No. | Description | Width (µm) | Interval (µm) | Length (mm) | Number of feet (pairs) |
| 012125 | IDA electrode (Au) | 10 | 5 | 2 | 65 |
| 012126 | IDA electrode (Pt) | 10 | 5 | 2 | 65 |
| 012127 | IDA electrode (Carbon) | 10 | 5 | 2 | 65 |
| 012128 | IDA electrode (ITO) | 10 | 5 | 2 | 65 |
![]()
New product line without passivation membrane
| Catalog No. | Description | Width (µm) | Interval (µm) | Length (mm) | Number of feet (pairs) |
| 012259 |
IDA electrode (Au) without passivation membrane |
10 | 5 | 2 | 65 |
| 012262 |
IDA electrode (Pt) without passivation membrane |
10 | 5 | 2 | 65 |
| 012265 |
IDA electrode (ITO) without passivation membrane |
10 | 5 | 2 | 65 |
| 012266 |
IDA electrode (Carbon) without passivation membrane |
10 | 5 | 2 | 65 |
IDA Electrode Connecting Cable kit
This device is used as a substituting item of a connecting part of IDA Electrode.
| Catalog No. | Description |
| 011066 | Cable kit for IDA electrode |
| Components | |
| Connecting Cable | |
| Electrode fixer | |
| Mini-Vice | |
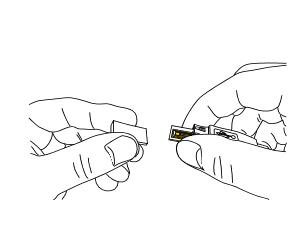
Please treat IDA Electrodes with care especially when you insert and remove them since it consists of quartz glass.

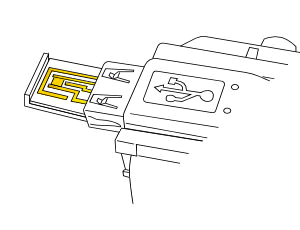
If you had a difficulty in setting up of an IDA Electrode into a connector at the cable, loosening the four grippers of the connector (shown in Figure below) with a tweezer would work.


Figure in right shows wire assembly of connecting cable.
In order to avoid abrasion on a connector part of the electrode, please insert and remove it according to the following order:
[IDA Electrode Setup Sequence]
(1)Put the IDA electrode into the connector
(2)Insert the white color electrode fixer into the connector
![]() Click
Click
[IDA Electrode Remove Sequence]
(1)Remove the white color electrode fixer from the connector
(2)Remove the IDA electrode from the connector
![]() Click
Click
New Product
![]()
New width in the product line, and you could have 2 µm
IDA with or without
passivation membrane.
| Catalog No. | Description | Width (µm) | Interval (µm) | Length (mm) | Number of feet (pairs) |
| 012257 | IDA electrode (Au) | 2 | 2 | 2 | 65 |
| 012258 | IDA electrode (Pt) | 2 | 2 | 2 | 65 |
| 012261 |
IDA electrode (Au) without passivation membrane |
2 | 2 | 2 | 65 |
| 012264 |
IDA electrode (Pt) without passivation membrane |
2 | 2 | 2 | 65 |